Friday, August 23, 2013

10 recipes in a mug

10 Recipes in a mug

I came across these delicious looking recipes a couple of days ago and wanted to share them all with you!

I do not take any credit for these delicious cake recipes.  All pictures and recipes are property of the websites listed under each picture.
Thanks all!


WARNING! RECIPES BELOW COULD BECOME ADDICTING AND CAUSE ONE TO CONSUME MULTIPLE SERVINGS! :)

Let's get started::


#1:  Brownie in a cup
Microwave Brownie in a Cup 
Heavenly...


#2: Chocolate and salted Carmel mug cake
I'm sorry, the picture is not edible


#3: Coffee cup quiche 
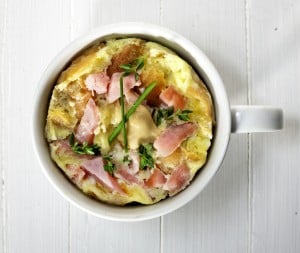
 Healthy and quick grab and go meal


#4:Nutella mug cake
Nutella Mug Cake recipe pictures
Oh sweet, sweet Nutella! Need I say more?


#5:Chocolate peanut butter mug cake
 Dangerous...


#6: Chocolate fudge S'mores in a mug
Better than a marshmallow and graham cracker from the store.


#7: Strawberry mug pies
Same author as the S'mores in a mug.


#8: Crustless quiche in a cup
Crustless Quiche in a Cup
Perfect single servings


#9: Seattle coffee mug cake
Picture of Seattle Coffee Mug Cake Recipe
Takes coffee cake to a whole new level


#10: Blueberry muffins in a mug
For those days when you only want one muffin...

Y'all have a super fun time trying out all these recipes.

I hope you enjoy all of these recipes!

Silly putty recipe!

 
Today I will teach you a recipe for silly putty!
Silly putty is a classic goo that has been around for years.
You can find a small history about it here. (pretty interesting)
You can find the original silly putty here at Hobby Lobby.  (love this place!)
...or...
You can make your own!
You are going to need: Borax, Water, food coloring, and glue.

  1. Mix together a even ratio of both cold water and glue. (I used clear glue, but you can also use white.) And if you can see by the pictures on all my GOO posts, I don't use Elmer's glue.  I went frugal and bought $0.50 bottles. It's cheap but has the same effect.
  2. At this point, go ahead and add in one or two drops of your food coloring. (if you are using colored 'Glitter glue' you do not have to add food coloring.
Classic Glitter Glue 
(All right to this picture go to Elmer's.com)
     3.  Now in a separate bowl, mix the borax and hot water together until the borax dissolves.
     4.  Pour the borax mixture into the glue substance.
     5.  The glue should coagulate.
     6.  Pour off the extra water and move the "silly putty" around in your hands for a while to mix everything together.
     7.  You can store silly putty in a plastic baggie, or in recycled plastic eggs from that Easter egg hunt a year ago!


Have fun!
Be silly!
And enjoy!


**CAUTION: this "silly putty" recipe does contain borax.  Borax as I understand is not at all harmful when touched or used in a recipe like this.  However, you should not consume borax or this recipe, or get it in your eyes.
For further concerns, I highly recommend you to do your own research...All I am saying is to just use it responsibly.  Like with any goo recipes, wash your hand afterwards**


Recipe::
  • 1 part cold water (I used 1/3 c.)
  • 1 part glue (I used 1/3 c.)
  • food coloring (optional)
  • 1 cup hot water 
  • 1 teaspoon borax

Playdough recipe

 
 Playdough is a classic dough that has been played with by kids for a long time, so let's continue this tradition and make and play with some right now!
Today I will show you a recipe for play dough!  
This recipe is for one color of play dough.
When you are done playing with it, store it in a plastic baggie for ensured freshness.
 
 
 Start with your water and food coloring. (recipe is at the bottom of this post)


 Next, add in your oil and stir a little to spread the oil around the bowl.
Add in your salt...stir...and add in your flour!
Mix with a fork, until everything is incorporated.


 knead with your hands for a moment and then play with it!
Continue to repeat this recipe until you have the desired amount of colors.


Recipe:
  • 1/3 c. water
  • 1/3 c. salt
  • 1 c. flour
  • A few drops of food coloring (optional) 

Enjoy!

Wednesday, August 21, 2013

Glow in the dark slime recipe

   
It's GOO time!
Today, I will teach you how to make glow in the dark slime, A sticky substance that glows-in-the-dark! 
How fun is that.


  You are going to need food coloring, glue, water, borax, and a bottle of glow-in-the-dark-paint. *Ask a parent for help*


  1. Mix together your glue and cold water in a medium sized bowl.
  2. Mix together your hot water and borax in a different and smaller bowl until the borax dissolves.
  3. To make this slime glow in the dark, add around half a bottle of glow in the dark paint to your glue mixture, along with one or two drops of food coloring.
  4. (I used two drops of green food coloring, and Anita's all-purpose glow craft paint.  You can find the paint and any other craft supplies on your list at my favorite place in the whole wide world: Hobby Lobby!)  Anita's glow paint is non-toxic too!
  5. Once you have added the coloring and mixed well, pour your borax mixture into your glue mixture. 
  6. A "magical" thing should happen when you do this.  Mix well until everything is a large clump and drain off the excess water.  You can mold the slime in your hands until it is good enough to give to your child.


Hold a flashlight up to your slime and head to a dark room!
Have fun slimeN' guys!


**Use borax and this goo responsibly.  Do not ingest.  Read label on borax before use**


Recipe:

  • 1/3 cup non-toxic glue
  • 2/3 cup cold water
  • Glow in the dark paint
  • Half a cup of hot water
  • 2 1/2 teaspoons of borax
  • food coloring

Monday, August 19, 2013

HOW TO BUILD: A Microphone and Stand


This Tutorial is on how to build a microphone with a stand.  
I hope this tutorial is helpful, and I would love for you to drop by often to check out what's new in the building world! 

HOW TO BUILD: A microphone and stand:
Every band needs a singer...So here he is!


This is a really easy design, all you need is a handful of pieces:


The microphone:


Now to make the stand:
Start with the two circular pieces.
These can be the same color or different colors like shown below:


Slide the next piece through the hole in the circular pieces:


Add on the next piece:
 And your microphone stand is done!


...Just put the mic on top... 
 ...And your singer is ready to rock out!


YOUR DONE!

Was that easy? Leave a comment below to tell me how you liked it!